RSS

Spicy Tomatoes and Okra

Image


Okay. I’m sorry that this is totally a crappy picture. I was too hungry to worry about trying to get anything decent. I promise you the picture doesn’t do this side dish justice. 

My inspiration was seafood gumbo and some frozen okra we had. I was trying to think of something to do with it, besides boiling which is a little plain, and frying, which is pretty unhealthy. 

This was a delicious side dish for the tasty salmon Justin cooked for dinner tonight.The two went together nicely, and I ended up mixing them and eating it as one dish. 

What you need:

  • Bag of frozen okra
  • Can of diced tomatoes
  • Onion, chopped
  • Bell pepper, chopped
  • Cajun seasoning (or you can make your own. I found a recipe here)
  • 1-2 chicken bouillon cubes (optional)

Pour the tomatoes, undrained, in a saucepan. Add your chopped onion and pepper and bring it to a soft boil. 

Once it’s simmering, add the okra and season it to your own taste. I used a pretty generous amount here. But as always, I did a lot of taste testing to make sure it was good. 

Let it simmer for 15-20 minutes until your vegetables are all tender. 

If it needs some extra flavor, add a bouillon cube or two. 


Super easy. Super flavorful. This makes a great side dish to any dinner. 


Leave a comment

Posted by on August 2, 2012 in Uncategorized


No Bake Strawberries and Cream Bar (topped with chocolate)

Image


This is a pretty unusual thing for me to make. I don’t do a lot of desserts. The hubby doesn’t eat many, therefore leaving me to consume an entire cake, or batch of brownies, or some other ridiculously large amount of dessert. I also have learned over the years, that baking is not really my thing. I guess that’s where this idea came in, since you don’t have to bake it. Originally I planned to do a layer of chocolate, but that didn’t turn out because I didn’t grease the dish, and it stuck to the bottom pretty bad. (See, desserts are NOT my thing.) Anyways, I had to improvise. Lucky for me, we had some Hershey bars laying around.

(Have I mentioned my husband works for The Hershey Company? We are all about some Hershey products in our house.)

The chocolate on top turned out pretty tasty, although it probably would have been better if I had some chocolate chips. I could have mixed them right in with the strawberries and cream layer, or sprinkled them right on top. Lesson learned.

What you need:

  • 1/2 lb fresh strawberries, pureed
  • 4 oz softened cream cheese
  • Tub of cool whip
  • Sugar (optional for sweetening strawberries)
  • Crumbled chocolate bare/chocolate chips

Puree the strawberries using a blender or food processor. You may want to add some sugar to them, depending on how sweet the strawberries are. I added about 1/4 cup probably. I didn’t exactly measure, just poured and tasted until it tasted right to me. 

Combine the puree, cream cheese, and about half the tub of whipped cream. Using an electric mixer, mix thoroughly. I did a lot of taste testing here too. I added and mixed ingredients until it tasted good to me, not overly sweet since I intended to add chocolate to it. 

Spread the strawberry cream mixture into a dish that will fit in your freezer. 

Spread a layer of cool whip on top of the strawberry cream layer. 

Let it freeze for a couple hours. Once it’s frozen/hardened, top with chocolate of your choice and enjoy.

And yes, I will most likely be eating this entire dessert by myself. Sad, I know. Justin has no idea what he is missing out on. 


Leave a comment

Posted by on July 25, 2012 in Uncategorized


The Best Crockpot Chili – EVER


Okay, so maybe this isn’t the best chili EVER, but it’s the best chili I have ever made. It is the perfect combination of sweet and spicy. Plus it’s made with a beef rump roast rather than ground beef. The beef is so tender and full of flavor, and basically shreds itself if you leave it in the crockpot long enough. We had to break the whole low carbs thing tonight, because this chili is best served on a tortilla. It’s also really good on potatoes, and is pretty darn good by itself too though.

Now, I have to confess, that I did pull the chili out of the crockpot for the last little bit of the cooking process, to help boil down some of the liquid. If you don’t want extra dishes to clean, I’m sure you could just skim the extra liquid off the top though.

What you need:

  • 2-3 lb rump roast
  • Can of tomato sauce
  • Can of diced tomatoes
  • Can of beef broth (lower sodium)
  • Can of chicken broth (lower sodium)
  • 1-2 onions
  • Chili powder
  • Brown sugar
For the chili seasoning
Image
  • 4 tbs chili powder
  • 1/4 cup brown sugar
  • 2 tbs onion powder
  • 2 tbs garlic powder
  • 1 tbs white pepper
  • 1 tbs of cumin
  • 2 tsp cayenne pepper
  • 1 tsp ground oregano
  • 1 tsp basil

(These measurements are just estimations of a baseline. I usually start with something similar to this, and taste test the chili from there. That way you know for sure it is seasoned to your taste.)
Chop the onions coarsely and place them in the crockpot. Pour equal parts chicken and beef broth over top of the onions. You don’t need much, just enough to coat the onions.
Image
Cut the bottom layer of fat off the beef and cut into 2-3 inch pieces. Put it in the crockpot and sprinkle with a little bit of chili powder and brown sugar. Pour the can of tomato sauce over the beef and onions, turn your crock pot on high and walk away.
Image
I cooked mine for about 6-7 hours, but I am pretty sure that the meat was tender and ready to shred long before that. I was just busy, and didn’t have time to get to it prior to that.
Once the meat is cooked, pour the contents of the crockpot into a sauce pot and bring it to a boil. This will help reduce down some of the liquid. Mine had waaaay more than it needed.
If your beef hasn’t already shredded on it’s own here, you should be able to shred it very easily. I literally just stirred it with a spoon, and it all broke apart.
Once the chili is boiling, make your spice mix and add it to the pot.
Image
Add the can of diced tomatoes and let it simmer until it is the consistency that you want it. This is where you might want to start tasting it and see if you want to add anything more to it. I usually do.
Image
Once you reach your desired consistency, your chili is ready to serve and eat. Like I mentioned above, this is so so so good on tortillas with a little bit of cheese. This was the first time I ever made this in the crockpot, and I was so nervous about it. I didn’t really know what I was doing, but I was REALLY pleased with the way it turned out. I hope everyone enjoys it as much as we did.
Image


Leave a comment

Posted by on July 13, 2012 in Beef


Sweet and Spicy BBQ Zucchini Chips

Image

A couple weeks ago, I saw a recipe on Pinterest for baked zucchini chips, and WOW, these were amazing. They were a perfect replacement for potato chips when you’re craving a salty snack, and of course, way lower in calories. I think I have made these at least five times since I found it. Ten million thanks to the blogger who posted this recipe. You can find it here. You are a hero in the Herron household.

I have been experimenting with different ways to flavor these and have found my favorite. We love spicy BBQ chips in this house. We can pretty easily down an entire bag in one or two sittings. So that was my inspiration for this. I think they turned out really good, but it could easily be changed to appeal to different tastes. I’m sure if you google “zucchini chips”, you could find thousands of different ideas.

So, after making and enjoying these zucchini chips many many times, my BRILLIANT husband had the genius idea of trying them in the dehydrator. He just made beef jerky a couple weeks ago, so I guess he had dehydrating on the mind. If you’re not an appliance junkie (like my husband), this can easily be done in the oven. I will tell how it’s done, or you can click on the link above.

What you need

  • Zucchini
  • Cayenne pepper
  • Chili powder
  • Brown sugar
  • Season salt 
Slice your zucchini as thin as you can possibly get it. This is a lot easier if you use a mandolin. It helps keep the slices a uniform size, therefore allowing them to cook consistently. It also makes the process considerably faster.
I am pretty sure my mandolin cost about $15 at Walmart, so it was no significant investment, but most definitely a worthy one.
Image
Image
See? Nice thin, even slices. It would have taken me forever to cut them like that on my own.
Next lay the zucchini slices in the dehydrator and season them with the spices listed above, or those of your choice. Make sure you go light on the spices, especially the cayenne. The zucchini really shrinks up a lot once it dries out, and will get very concentrated. If you put too much cayenne, you will be drinking a lot of milk along with your chips.
Image
Turn your dehydrator on to 135 degrees and walk away.
I only did two layers, which was 2 zucchini worth when I made it this time. It took 2.5-3 hours. I started checking it after the first hour or so because I really wasn’t too sure how long it would take.
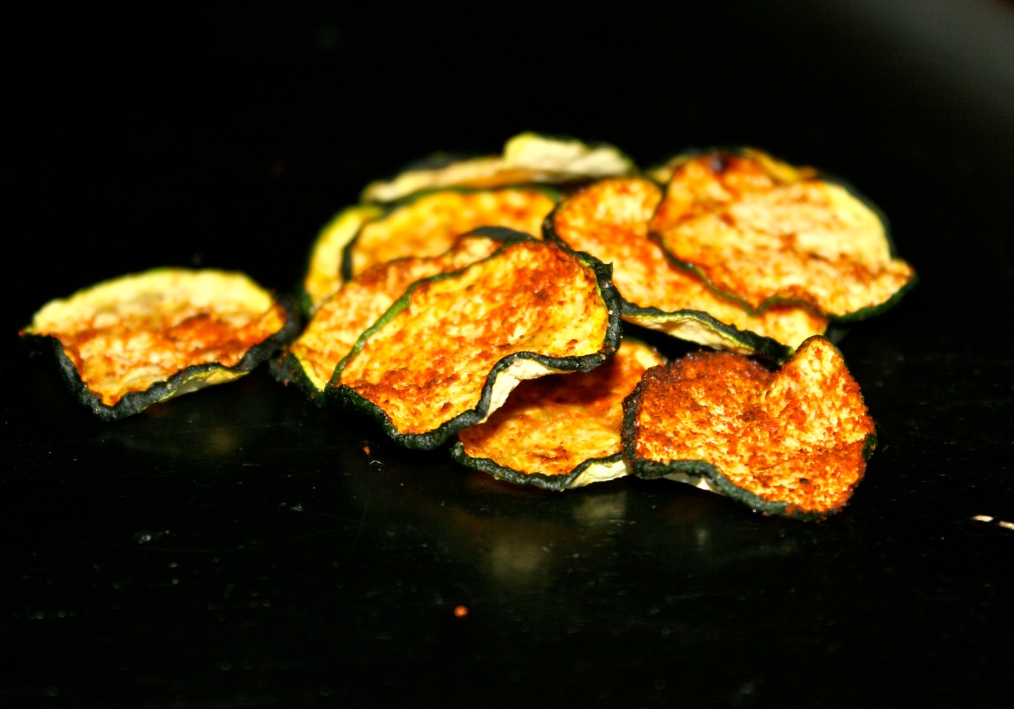
You will know it’s done when it looks like the picture below. The zucchini slices will be nice and crisp, just like a real chip. There’s no harm in taste testing along the way too. They still taste pretty good, even when they’re not done yet.
Image
This was slightly easier, and tasted slightly better than cooking them in the oven. The best part was, I didn’t have to have my oven on for almost 2 hours when it is 100+ degrees outside. They came out a little bit crisper than they do when I make them in the oven. It’s also nice to use the dehydrator because you can make more at a time. I can only ever seem to fit one zucchini worth of chips in my oven.
If you want to use your oven, it’s pretty much the same steps….
Preheat the oven to 225
Slice, coat with cooking spray, and season.
Bake for 45 minutes, flip, and bake for another 30 minutes or so.
In the oven, I found the closer the chips are to the bottom, the better they turn out.
I did not use cooking spray on half of the dehydrated zucchini and both halves turned out exactly the same. I had no issues with sticking, so I don’t think it’s necessary if you are taking that route.
And yeah, I ate two zucchini worth by myself in one sitting. Don’t judge, they were delicious. Just make sure you make a lot.
 
1 Comment

Posted by on July 11, 2012 in Side Dishes

 
Link

Image

Apparently the other day, Justin and I were both craving Italian. I sent him to the store to get dinner. I was thinking that I wanted spaghetti or lasagna, or something like that, but left him in charge. He came home with tomato sauce, squash, zucchini, and ground turkey (to make meatballs). I guess we were on the same page. (Already, and we have only been married 3 years!)

Anyways, I made meatballs, and they didn’t turn out very good. They were a little bit dry and bland. Since we had enough ingredients to do everything for a second night, I figured I would try again. Round two was so much better than round one.

I don’t really know that these are that different than any other meatball recipe you can find out there, but here it is anyway.

What you need:

  • 1 lb of ground turkey
  • 1 egg beaten
  • 1/4 cup of parmesan cheese
  • 1/4 cup of seasoned bread crumbs
  • A splash of tomato sauce
  • Oregano, basil, fennel, and parsly to taste
  • 1-2 tablespoons of minced garlic
  • 1/2 cup chopped onions

Preheat your oven to 375
Combine all ingredients and mix.
Image
As far as the seasonings go, I put A LOT. More than you would think appropriate. And the tomato sauce helped with the dryness from the previous night. I would have also loved to add some red wine (cooking or regular), but for some reason I didn’t have any. Next time, I guess.
Shape your mixture into meatballs (not too big, or they will take forever to cook).
Image
Cook for 25 minutes
Mine looked like this when they came out
Image
All that parmesan cheese was oozing out of them. SO yummy!
I served this with our veggie meaty marinara, just replaced the ground beef with meatballs instead. It was a fun different spin on something we already know and love.
 
Leave a comment

Posted by on July 10, 2012 in Turkey


Tomato and Pesto Chicken Veggie Bake

Image

It has been a LONG time since I have blogged anything. We have been on vacation and eating terrible. Now we’re back at home, a couple pounds heavier, and back to our own kitchen. It sucks, I know, but that’s life.

Tonight’s dinner started with the idea of making baked pesto chicken and expanded from there. I couldn’t decide what I wanted to make to go along with the chicken, so I tried to think of some vegetables that would go good with pesto. I originally planned to add zucchini to this too, but once I was making everything, I chickened out. I thought it might taste a little odd, so I opted to keep it out. Luckily, that means I have some extra zucchini laying around. I guess have to think of something fun to do with that.

I didn’t take any pictures while making this today. It was pretty quick and easy though. No lengthy descriptions needed.

What you need:

  • 1/2 cup of pesto sauce
  • Can of diced tomatoes
  • 2 medium red bell peppers
  • 1 cup of mushrooms
  • 1-2 lbs of chicken breast
  • Salt, pepper, and oregano to taste

Preheat your oven to 375 degrees.
Cut the chicken into 1-2 inch pieces.
Chop the bell pepper and mushrooms.
Combine all the ingredients (pesto, canned tomatoes, mushrooms, bell pepper, chicken, salt, pepper, and oregano) in a baking dish and mix thoroughly.
Cover and cook for 50 minutes, or until the chicken is cooked and the veggies are tender.
Image
I was afraid of this being dry, but it definitely was not. We will most likely be making this again soon, because we really enjoyed it.
Also, I am sure this would be really tasty if you added mozzarella or parmesan cheese to it, but I didn’t because I was trying to keep the calories down. Next time though…. Maybe
 
Leave a comment

Posted by on July 9, 2012 in Casseroles, Chicken


SUCCESSFUL Cauliflower Pizza Crust

Recipes for low carb cauliflower pizza crusts have been blowing up pinterest lately. When I first saw this, I was SO excited about it. I LOVE pizza, however I DON’T love the carbs in it. So we tried it, a few times, and it never exactly turned out right It always tasted great, but it stuck to the pan really bad. So after some trial and error and A LOT of research, my amazingly smart husband finally got it right. And this pizza turned out amazing. It tasted like a homemade thin crust pizza, only better. It was so delicious, we are having the same thing again tomorrow night.

So, if you made this and experienced that same problems we did, or if it’s your first attempt, I hope this can shed some light on how to make a delicious, healthier, low carb pizza.

What you need:

  • 2 cups uncooked frozen califlower (you can use fresh, but frozen was much easier and tasted just the same)
  • 1 cup of shredded mozzarella cheese (I used fat free)
  • 1 egg
  • 1 teaspoon of oregano
  • 1 teaspoon of basil
  • 1/2 garlic powder
  • 1/2 teaspoon of fennel 
  • Pizza toppings of your choice (including cheese, the cheese listed above goes into the dough)

Preheat the oven to 450 degrees

Put the cauliflower in a microwavable bowl and microwave for 10 minutes (8 minutes if cauliflower is thawed).
Put the cauliflower in the food processor and pulse until it is the consistency of rice. Make sure you do not over pulse it here. If it’s too shredded, the dough can be more difficult to spread. It should look like this….

Image

Once the cauliflower is “riced”, wrap it in a paper towel for a couple minutes. This will help pull some of the moisture out of it, and make it cook a little nicer.

Image

Combine the cauliflower in a bowl with the cheese, egg, and spices listed above. Mix thoroughly until the cheese is melted.

Spread a piece of parchment paper on a pizza pan and really coat it with some cooking spray. We learned the hard way that these are probably the most important steps. You CANNOT use aluminum foil or wax paper. It will stick… BAD… and you will lose a lot of that tasty deliciousness.

To spread your dough on the pizza pan, start on the outside with “blobs” of the dough mixture working your way in. Make the dough as thin as you can physically get it. It should be almost translucent.

This makes a very thin crust pizza. About as thin as a potato chip. So if you’re a fan of the deep dish, I’m sorry this is not for you.

Image

If you have extra of the dough mixture, don’t worry about it, and don’t try to use it all. We had a little bit of leftover too, and made some extra little mini pizzas out of it. They were also delicious.

Image

Bake your dough at 450 for 15-20 minutes. You will know it’s ready to come out of the oven when it looks very crisp and just on the verge of burning. You should be able to lift the edge of the pizza with a spatula. It may take slightly longer than 20 minutes depending on your oven and how thin the crust is. If you pull it out too soon, the pizza will be pretty messy and hard to eat like a normal pizza.

Once you pull the cooked crust out of the oven, turn your oven to Broil.

Last but not least, add your sauce, cheese and toppings to the pizza. Place under the broiler for 2-4 minutes, or until your cheese is melted. Make sure to go light on the sauce here, because it may soften up your crust.

Cut your pizza up, and enjoy. Hopefully your pizza will turn out as ours did.
 
Leave a comment

Posted by on June 24, 2012 in Uncategorized


Cheddar and Spinach stuffed Chicken Breast

Image

I love coming up with different ways to cook chicken. It’s cheap and it’s low in calories. I have all kinds of different cuts of chicken in the fridge right now because Justin bought a whole chicken and cut it into pieces. (I will blog about how to do that later. It is a definite money saver, as long as you can get past the whole dealing with raw chicken thing). 

Anyway, I’ve seen a couple recipes for stuffed chicken breast floating around lately and was inspired. I stuffed these with low fat cheddar cheese, spinach, and some spices and coated it with some panko seasoned bread crumbs. It turned out super juicy, full of flavor, and fairly low on the calorie end (383 calories for a large chicken breast). 

This was easy and quick to prepare too. Pound the chicken, stuff the chicken, roll the chicken, bake the chicken, and eat the chicken! Easy as that. 

Image

It was so easy that I even had time to snap a few pictures of my adorable two year old while preparing it. 

Image

No, he didn’t eat this with us. That’s his dinner, a pop tart, on his face. Great parenting. I know!

That’s besides the point, Back to the chicken…

What you need:

  • 2 Chicken breasts
  • 1/2 – 1 cup spinach (I used frozen, thawed)
  • 1/2 cup cheddar cheese
  • Season salt, paprika, garlic powder, onion powder, salt, and pepper.
  • 1/3 cup of seasoned bread crumbs
Preheat your oven to 350 degrees. 
Lay the chicken flat between a folded piece of saran wrap. Pound it with a meat mallet (a cup works fine if you don’t have one). Pound it until your meat is about 1/4 inch thick. 
 
Image
 
Combine the spinach, cheese, and seasonings together. 
 
Spray a baking dish with cooking spray, and place your chicken in it. Spread half the spinach/cheese mixture about 3/4 way across your chicken. Do the same on the other chicken breast.
 
Image
 
 
Start at the covered end of the chicken, and roll it up. I read in a few recipes that people use tooth picks to hold their’s together, but I didn’t do it, and mine held together fine. 
 
Coat the chicken with the bread crumbs. Even though the bread crumbs were seasoned, it still tastes a little bland to me, so I added a little bit of the same spices I put in the cheese mixture. 
 
Bake the chicken at 350 for 45 minutes. 
 
This chicken must have tasted good to Justin, because he ALMOST always puts hot sauce on any chicken I cook, and he didn’t today. I would call that a success! 


Leave a comment

Posted by on June 24, 2012 in Chicken


Baked Zucchini Parmesan Strips

Image

I am starting to think that Justin and I might have a slight obsession with zucchini. It is making a weekly appearance at our dinner table lately. Sometimes more than once a week. This recipe was adapted from several different recipes I have seen all over pinterest lately.

What you need

  • 2-3 Zucchini
  • 4 tablespoons of parmesan cheese
  • Salt and pepper to taste
  • Garlic powder to taste
  • Onion powder to taste
  • Cooking spray

Preheat the oven to 450 degrees.
Cut the zucchini into strips.
Image
I used three, and the two of us had no problems at all downing it.
Spray a cookie sheet with cooking spray, and line with your chopped zucchini. Spray the top of the zucchini and coat with your seasonings and cheese. When I ate this I was really wishing I had used more cheese so feel free to be generous with it.  Flip the zucchini over and do the same thing on the other side.
Image
Bake them for 15=20 minutes.
Last, turn the broiler on for another 5 minutes or so. Just long enough to get the cheese nice and browned on top.
Image
It will look like that after you pull it out of the oven. Like I said, this really would have been better with more cheese, and maybe some oregano or italian seasoning. It was still tasty, and a fairly low calorie side to dinner. We will most likely have the same thing with tomorrows dinner.
 
Leave a comment

Posted by on June 22, 2012 in Side Dishes


Portabella Burgers

Image

Justin loves mushrooms, and we’ve had some burgers in the freezer leftover from Wylin’s birthday party. The burgers were really tasty, made from meat ground with our kitchenaid meat grinder. I have been dying to eat them again, so I thought it would be a good time to try this.

It doesn’t really get more simple than this. Make your burgers. Replace the bun with a baked portabella mushroom cap. Then you have a nice low carb burger. Perfect!

For the “portabella bun”

What you need

  • Portabella mushroom caps
  • Olive oil
  • Onion powder
  • Garlic powder
  • McCormick’s Montreal steak seasoning
Image
Preheat the oven to 350 degrees
Scrape the gills and stem from the bottom of the mushroom cap with a spoon. Justin did a MUCH better job of this than me. Mine did not look pretty at all. Just make sure you are very gentle with the mushroom, or it will all fall apart like mine did. Lesson learned.
Image
Drizzle some olive oil on both sides of the mushroom and rub some of the seasoning on it.
Bake for about 15 minutes. I sprinkled some cheese on top of mine for the last 2-3 minutes.
For the burgers
  • 1 lb of ground beef (I combined chuck and sirloin)
  • 1/2 cup chopped onions
  • 1/2 cup cheddar cheese
  • A few drops of soy sauce
  • A squeeze of barbecue sauce 
  • McCormicks Montreal steak season

Combine all the ingredients together, mix thoroughly, form your burgers, and cook to your desired temperature.
Image
 
Leave a comment

Posted by on June 22, 2012 in Beef